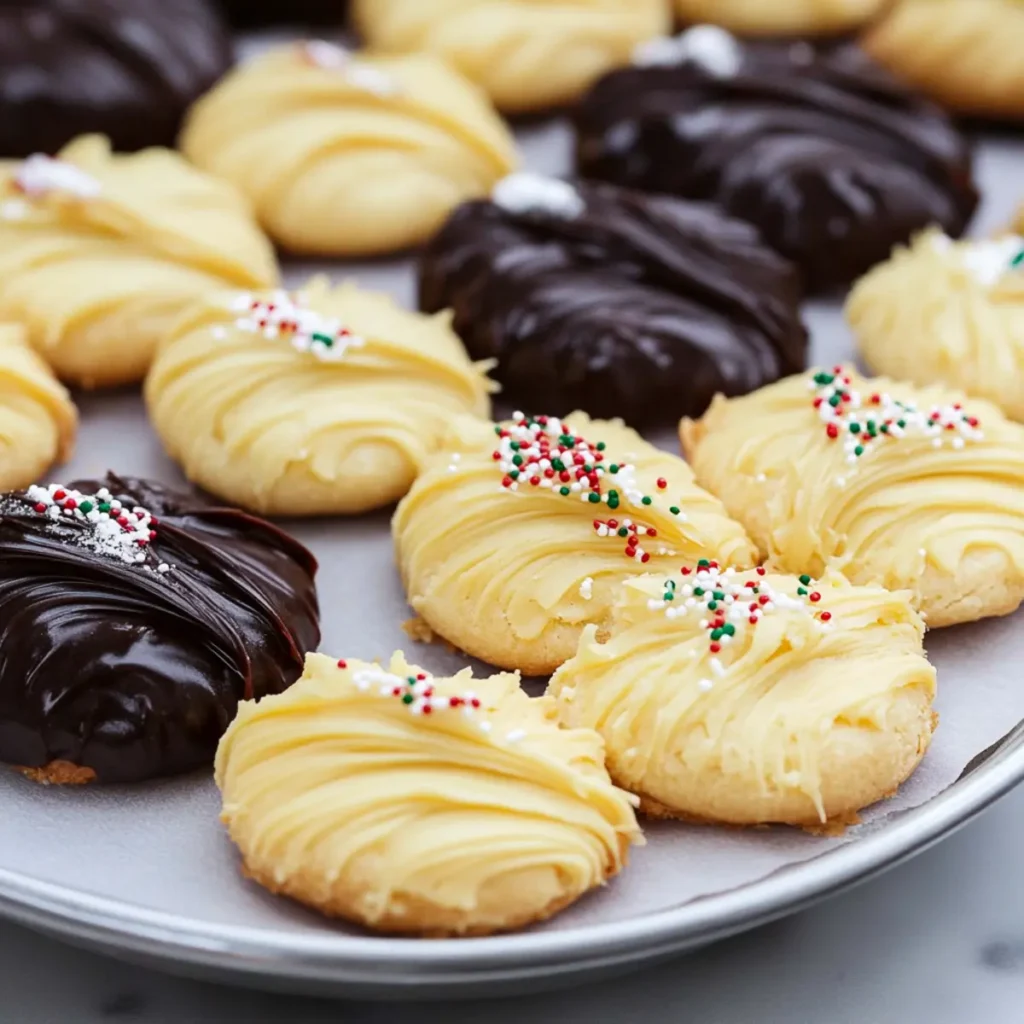
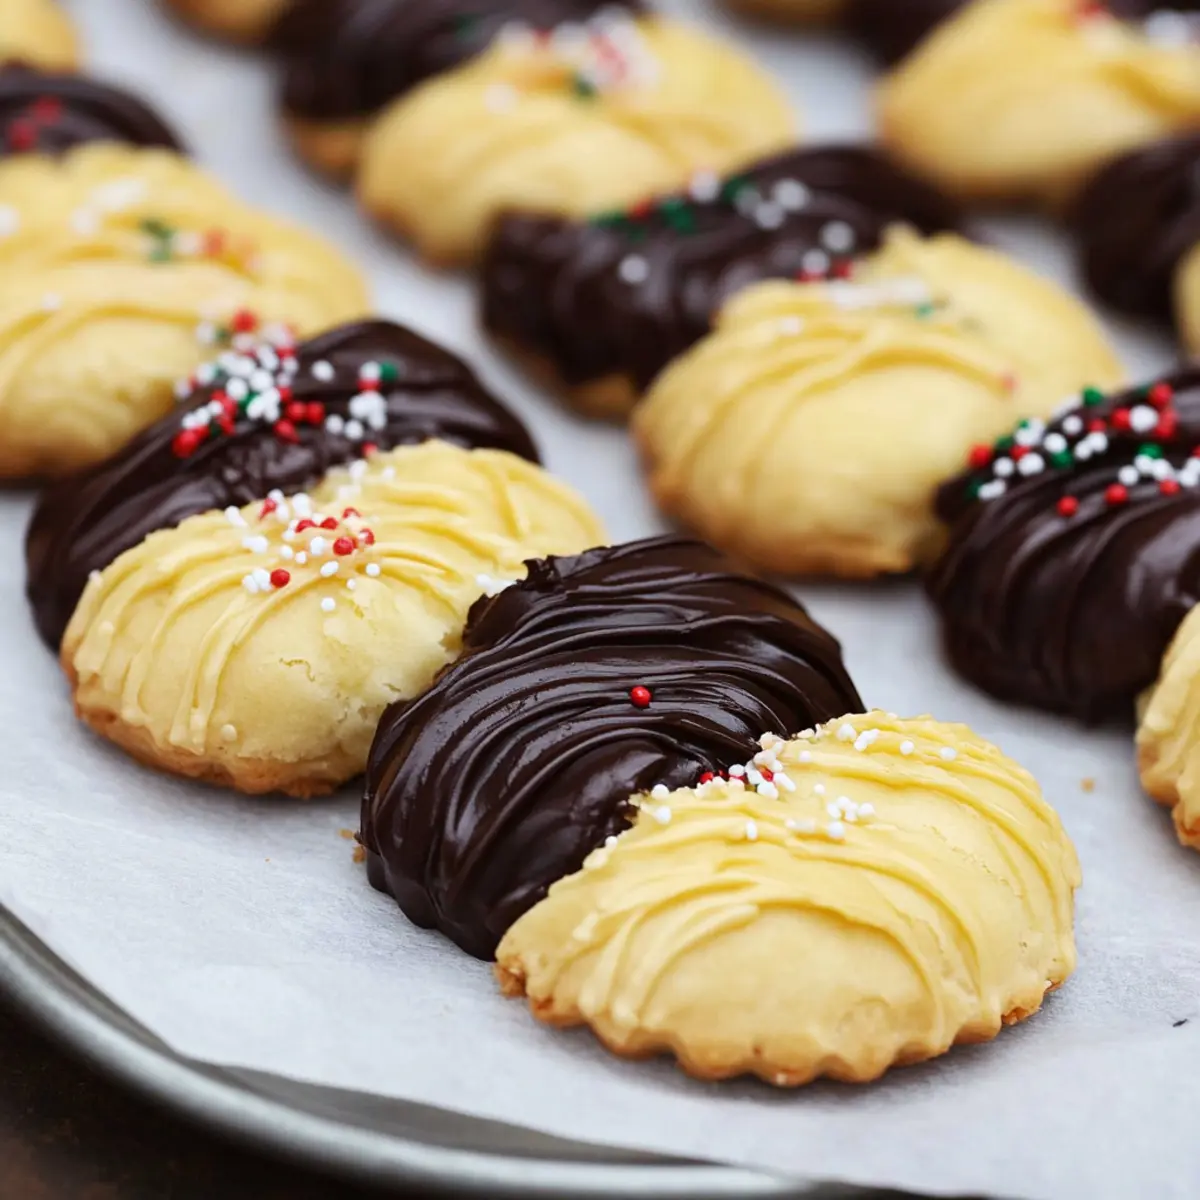
When the holiday season rolls around, nothing quite captures the spirit of celebration like a batch of homemade cookies. The moment the warm aroma of buttery goodness fills the kitchen, you know it's time to gather friends and family for cookie exchanges and festive gatherings. My favorite way to embrace this tradition is with Classic Danish Butter Cookies, whose crispy edges and soft interiors have made them a cherished recipe in my home.
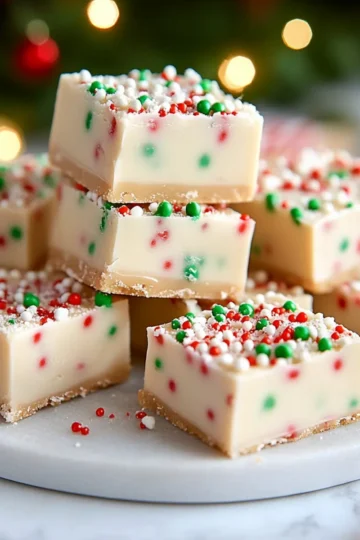
Dipped in luscious chocolate and adorned with colorful sprinkles, these cookies not only look delightful but also taste like pure magic. Best of all, their simple preparation makes them accessible for both novice bakers and seasoned chefs alike. So, roll up your sleeves and prepare to create a treat that will not only sweeten your holiday festivities but also provide a delicious escape from the mundane fast-food routine. Let's dive into this timeless Danish Butter Recipe and make some enchanting memories together!

Why will you love this Danish Butter Recipe?
Irresistible Flavor: The buttery richness and hint of vanilla create an unforgettable taste that you simply can't resist.
Festive Appeal: Dipped in luscious chocolate and topped with colorful sprinkles, these cookies are perfect for holiday gatherings and gift-giving.
Easy to Make: With straightforward steps, even novice bakers can create impressive cookies that look and taste spectacular.
Versatile Variations: Feel free to experiment with different flavors and toppings to match your holiday themes or personal taste.
Crowd-Pleasing Snack: These delightful treats are sure to please anyone, making them a hit at cookie exchanges or family gatherings.
For more delicious inspirations, check out our comprehensive guide to holiday baking!
Danish Butter Recipe Ingredients
For the Cookie Base
• Unsalted Butter - Provides fat and richness for a tender cookie; swap with margarine or dairy-free butter for a vegan option.
• Granulated Sugar - Sweetens the cookies and contributes to their soft texture; coconut sugar can be a great less refined substitute.
• Large Egg - Acts as a binder and moisture source, adding to the cookie's structure; for an egg-free version, use a flax egg (1 tablespoon ground flaxseed mixed with 2.5 tablespoon water).
• Vanilla Extract - Enhances the delicious flavor profile of the cookies; almond extract can be used for a unique twist.
• All-Purpose Flour - The main ingredient that gives cookies their structure; for gluten-free cookies, opt for a gluten-free all-purpose flour blend.
• Salt - Balances the sweetness and enhances overall flavor; essential for a classic taste.
• Milk - Makes the dough pliable and easy to pipe; you can reduce or omit it for a thicker dough if needed.
For the Chocolate Coating
• Semi-sweet or Milk Chocolate - Perfect for dipping the cookies, adding sweetness and a rich flavor; dark chocolate offers a more intense experience.
• Sprinkles - Provide a fun and festive look to the cookies; feel free to choose any type to match your holiday theme.
With this Danish Butter Recipe, you'll create a batch of cookies that will surely add joy to your holiday festivities!
How to Make Danish Butter Cookies
-
Cream Butter and Sugar: In a stand mixer, cream together the unsalted butter and granulated sugar until the mixture is light and airy, around 3-5 minutes. This step is crucial for achieving that perfect texture!
-
Incorporate Egg and Vanilla: Add the large egg and vanilla extract to the creamed mixture, mixing until fully incorporated. You should see a smooth blend with no lumps.
-
Add Dry Ingredients: Gradually mix in the all-purpose flour and salt until just combined. Make sure not to overmix, as you want the cookies to stay tender.
-
Adjust Dough Consistency: Stir in the milk a little at a time until the dough reaches a pipeable consistency-thick yet manageable, perfect for creating beautiful shapes.
-
Pipe Cookies: Transfer the dough to a piping bag fitted with a large tip. Pipe 2-inch swirls or rosettes onto a non-stick baking sheet, leaving space between them.
-
Chill Cookies: Refrigerate the piped cookies for 15-20 minutes. Chilling helps the cookies maintain their shape while baking, so don't skip this step!
-
Preheat Oven: While the cookies chill, preheat your oven to 350°F (175°C) to ensure it's hot and ready when the cookies are prepared.
-
Bake: Place the cookies in the oven and bake for about 15 minutes. They should be golden brown at the edges, while the centers remain pale.
-
Cool: Once baked, allow the cookies to cool on the baking sheet for 10 minutes before transferring them to a wire rack to cool completely.
-
Prepare Chocolate: Melt the semi-sweet or milk chocolate using a double boiler, or microwave it in increments, stirring until smooth and glossy.
-
Dip and Decorate: Dip ⅔ of each cooled cookie into the melted chocolate, then place them on parchment paper. Sprinkle with colorful sprinkles before the chocolate sets.
Optional: Drizzle with additional melted chocolate for a fancier presentation!
Exact quantities are listed in the recipe card below.

Danish Butter Recipe Variations
Feel free to get creative with this cookie recipe for an even more delightful experience.
-
Vegan: Swap the butter for coconut oil or dairy-free butter and use a flax egg instead of a large egg. The result will be just as tasty!
-
Gluten-Free: Replace all-purpose flour with a gluten-free flour blend. This way, everyone can enjoy these delicious cookies without worry.
-
Chocolate Twist: Use dark chocolate or flavored candy melts instead of semi-sweet for dipping. Each bite becomes an exciting surprise!
-
Flavor Enhancer: Add a teaspoon of almond or maple extract to the dough for a delightful aromatic twist. Your cookies will boast a unique flavor profile that will impress.
-
Nutty Surprise: Fold in some finely chopped nuts or almond slices into the dough for an additional layer of crunch. The nutty flavor enhances the richness of the cookie beautifully!
-
Holiday Spice: Mix in a pinch of cinnamon or nutmeg to the dough for a warm spice profile that's perfect for the festive season. It will fill your kitchen with enticing aromas!
-
Candy Coated: After dipping in chocolate, top the cookies with crumbled peppermint candies or toffee bits to add a flavorful crunch. Perfect for that festive touch during the holidays.
-
Bite-Sized: Pipe the dough into smaller swirls for mini cookie bites. They make for an adorable addition to cookie platters and are perfect for sharing!
Helpful Tricks for Danish Butter Cookies
- Piping Technique: Use a wide piping tip, like Ateco 849, to maintain the shape of the Danish Butter Cookies and create beautiful swirls or rosettes.
- Cooling in the Fridge: Don't skip refrigerating the piped cookies for 15-20 minutes. This crucial step prevents spreading and helps achieve the desired crispy edges.
- No Parchment Paper: Avoid using parchment paper underneath uncooked cookies. The dough may lose its shape, and achieving the perfect texture is key!
- Adjusting Dough Consistency: If the dough feels too thick to pipe, gradually add small amounts of milk until it reaches a perfect pipeable texture for your Danish Butter Cookies.
- Watch Baking Time: Keep an eye on your cookies during baking. Every oven is different, and you want them golden brown around the edges but still soft in the center.
Make Ahead Options
These Classic Danish Butter Cookies are perfect for meal prep enthusiasts! You can prepare the dough up to 24 hours in advance. Simply follow the recipe up until the piping step, then wrap the dough tightly in plastic wrap and refrigerate. This will keep the dough fresh and maintain its flavor. You can also piped cookies be prepared ahead and stored in the fridge for up to 3 days before baking, helping you save valuable time on busy days. When you're ready to serve, simply bake the cookies as directed, dip them in chocolate, and sprinkle with your favorite topping for delightful, homemade treats that look and taste just as delicious as if you made them fresh!
What to Serve with Danish Butter Cookies?
When you're ready to share these charming treats, let's pair them with delightful accompaniments to enhance the experience.
-
Rich Hot Chocolate: The velvety smoothness of hot chocolate complements the buttery cookies, creating a cozy indulgence perfect for winter nights.
-
Freshly Brewed Coffee: A well-rounded cup of coffee balances the sweetness of the cookies, making it an ideal pairing for lively brunches or afternoon pick-me-ups.
-
Spiced Chai Latte: The warming spices in chai elevate the festive spirit while contrasting beautifully with the cookies' rich texture and sweet chocolate coating.
-
Vanilla Ice Cream: A scoop of creamy vanilla ice cream offers a luscious contrast to the crispy cookies, resulting in a delightful treat that merges textures and temperatures.
-
Fruit Platter: A vibrant platter of fresh fruits brings a refreshing and light element. The natural sweetness and acidity counterbalance the richness of the cookies, enhancing each bite.
-
Nutty Biscotti: Include a few biscotti for an added crunch. Their toasted flavors work harmoniously with the cookie's buttery notes, creating a delightful snacking experience.
-
Holiday Punch: A festive holiday punch-think cranberry or spiced apple-adds a cheerful, refreshing drink option that pairs nicely with the cookies' richness.
-
Ginger Tea: A fragrant ginger tea complements the sweet and buttery flavors, making it a soothing pairing that warms both heart and spirit during chilly evenings.
These lovely suggestions will help you create a warm, inviting atmosphere for sharing your Danish Butter Cookies during the holiday season!
Storage Tips for Danish Butter Cookies
- Room Temperature: Keep the cookies in an airtight container at room temperature for up to one week. This ensures they stay crispy and fresh.
- Fridge: If you prefer, you can store the cookies in the fridge for a firmer texture, but be sure to keep them in an airtight container to prevent moisture absorption.
- Freezer: For longer storage, freeze the Danish Butter Cookies without chocolate for up to three months. Once thawed, dip them in chocolate and decorate as desired.
- Reheating: If you want to enjoy them warm, pop them in the oven at 300°F (150°C) for about 5 minutes until heated through-this helps restore their delightful crunch!
Classic Danish Butter Cookies with Chocolate and Sprinkles Recipe FAQs
What should I look for when selecting unsalted butter?
Always choose high-quality unsalted butter for the best flavor in your Danish Butter Cookies. Look for butter that is pale yellow in color and has a creamy texture. Avoid butter that has any dark spots or a rancid smell. If you want to keep it dairy-free, margarine or dairy-free butter can be a suitable substitute!
How should I store my Danish Butter Cookies?
Store your cookies in an airtight container at room temperature for up to one week. This keeps them fresh and crispy! If you wish to keep them longer, you can refrigerate them, but make sure to use an airtight container to prevent moisture.
Can I freeze Danish Butter Cookies?
Absolutely! To freeze, place the baked cookies (without the chocolate coating) in a single layer on a baking sheet until frozen solid. Then, transfer them to an airtight container or freezer bag and store them for up to three months. When ready to enjoy, simply thaw them and dip them in chocolate before serving!
What can I do if my cookie dough is too thick or too thin?
If your dough is too thick to pipe, gradually mix in small amounts of milk until you achieve a smooth, pipeable texture. Conversely, if the dough is too thin, add a tablespoon of flour at a time until it thickens up. Remember, the ideal dough should hold its shape when piped!
Are there any dietary considerations I should be aware of with this recipe?
Yes! Be cautious with allergens. This recipe contains eggs and wheat, so if you're baking for someone with allergies, you can substitute the egg with a flax egg (1 tablespoon ground flaxseed mixed with 2.5 tablespoons water) and use gluten-free all-purpose flour. Always check ingredient labels to ensure compatibility with dietary needs!
Can I use other types of chocolate for dipping?
Certainly! Feel free to experiment with different types of chocolate, such as dark chocolate for a richer flavor, or even white chocolate for a sweeter twist. You can also add flavor extracts or sprinkles to suit festive occasions!

Equipment
- Stand Mixer
- Piping bag
- baking sheet
- Double Boiler
Ingredients
For the Cookie Base
- 1 cup Unsalted Butter Provides fat and richness for a tender cookie.
- ¾ cup Granulated Sugar Sweetens the cookies for a soft texture.
- 1 large Egg Acts as a binder; use flax egg for egg-free.
- 1 teaspoon Vanilla Extract Enhances flavor; almond extract can be a substitute.
- 2 cups All-Purpose Flour Main ingredient for structure; use gluten-free option if needed.
- ¼ teaspoon Salt Balances sweetness.
- 1 tablespoon Milk Adjust for dough consistency.
For the Chocolate Coating
- 1 cup Semi-sweet or Milk Chocolate For dipping cookies.
- ½ cup Sprinkles For decoration.
Instructions
Danish Butter Cookies Preparation
- In a stand mixer, cream together the unsalted butter and granulated sugar until light and airy, around 3-5 minutes.
- Add the large egg and vanilla extract to the creamed mixture, mixing until fully incorporated.
- Gradually mix in the all-purpose flour and salt until just combined.
- Stir in the milk until the dough reaches a pipeable consistency.
- Transfer the dough to a piping bag fitted with a large tip. Pipe 2-inch swirls onto a non-stick baking sheet.
- Refrigerate the piped cookies for 15-20 minutes.
- Preheat your oven to 350°F (175°C).
- Bake for about 15 minutes until golden brown at the edges.
- Allow the cookies to cool on the baking sheet for 10 minutes before transferring them to a wire rack.
- Melt the semi-sweet or milk chocolate using a double boiler until smooth.
- Dip ⅔ of each cooled cookie into the melted chocolate and sprinkle with colorful sprinkles.

Leave a Reply